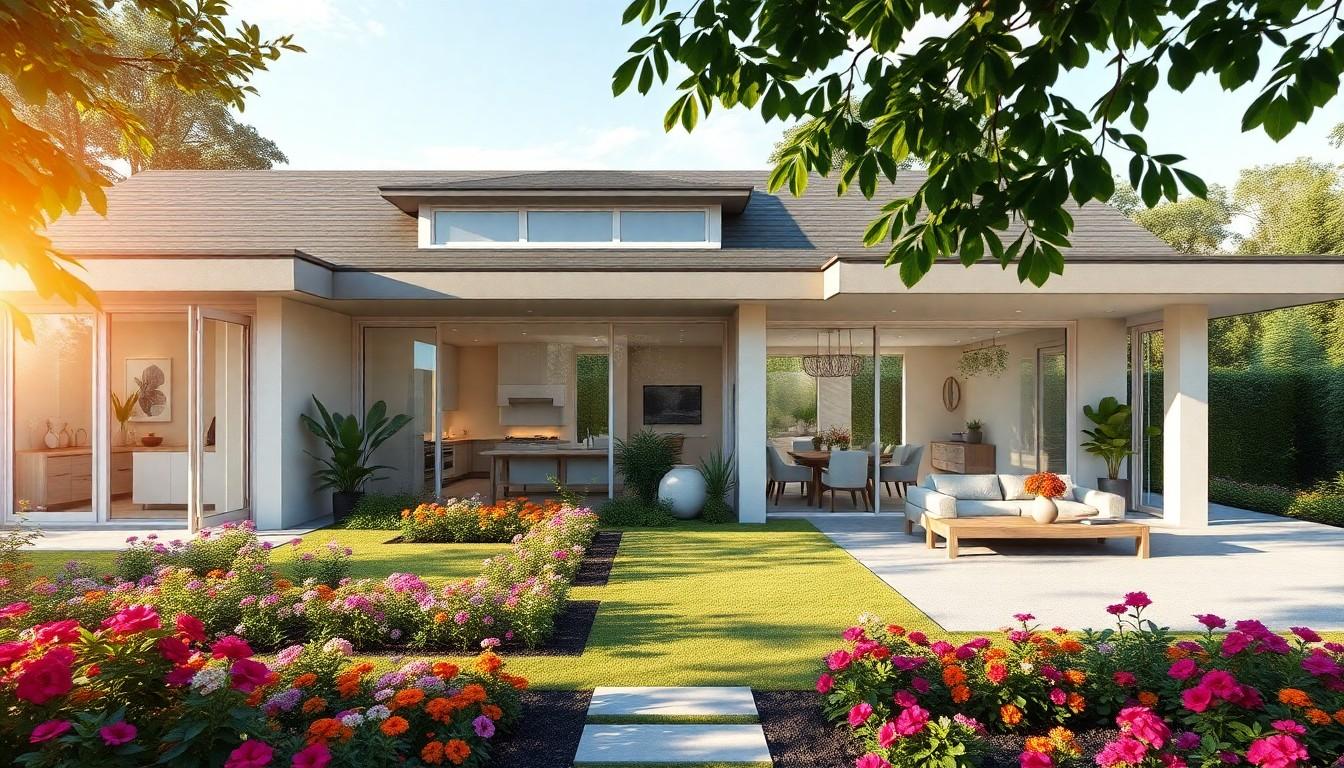
An outdoor kitchen attached to the house bridges the gap between interior comfort and open-air entertaining. Instead of running back and forth through sliding doors with platters and condiments, everything sits within a few steps of the indoor kitchen, dining room, or family room. This setup turns meal prep into a social event and keeps the cook connected to guests. Whether planning a full summer kitchen with a built-in grill and sink or a compact grilling station with counter space, attaching the structure to existing walls streamlines utility access, simplifies roofing, and creates a cohesive design that feels like a natural extension of the home rather than a detached island in the yard.
Table of Contents
ToggleKey Takeaways
- An outdoor kitchen attached to the house reduces utility infrastructure costs by extending existing plumbing, electrical, and gas lines just a few feet rather than trenching across the yard.
- Optimal layouts require at least 8 to 10 feet of linear counter space and position the grill, sink, and refrigerator within a few steps of each other following the work triangle concept.
- Material selection is critical for durability—use masonry bases, stainless-steel cabinetry, porcelain or granite countertops, and marine-grade finishes to withstand temperature swings, UV exposure, and freeze-thaw cycles.
- Building permits are required for any outdoor kitchen attached to the house, covering electrical GFCI protection, plumbing code compliance, gas connections, and structural footing requirements under the International Residential Code.
- Design continuity—matching siding, trim, flooring transitions, lighting, and cabinet styles between indoor and outdoor spaces—makes the outdoor kitchen feel like a natural home extension rather than a detached addition.
- Account for critical clearance zones: built-in grills need 6 inches clearance to combustible materials and 24 inches above the cooking surface, plus a 42-inch aisle for foot traffic in front of cabinetry.
Why Attach Your Outdoor Kitchen to Your House?
Attaching an outdoor kitchen to the house offers practical and structural advantages that a freestanding setup can’t match. Utility access tops the list: plumbing, electrical, and gas lines already terminate at the house, so extending them a few feet along an exterior wall requires far less trenching, conduit, and labor than running lines across the yard to a pavilion. This proximity also simplifies code compliance, since inspectors can verify connections at a single point rather than inspecting buried runs.
Shared walls and rooflines cut material and framing costs. If the outdoor kitchen tucks under an existing eave or patio roof, the builder skips the expense of posts, beams, and sheathing a standalone structure would demand. The house wall doubles as a windbreak, shielding burners from gusts that can blow out pilot lights or skew grill temperatures.
Convenience matters just as much. A door to the indoor kitchen means shorter trips for ingredients, utensils, and ice. Guests can move fluidly between climate-controlled space and fresh air without navigating stairs or crossing wet grass. This flow proves especially valuable during shoulder seasons, when evenings turn cool but midday sun invites outdoor cooking.
Finally, an attached kitchen leverages existing architecture. Windows, siding profiles, and roof pitches guide the design, creating visual continuity that raises curb appeal and resale value. Buyers recognize the investment in infrastructure and see the setup as a permanent upgrade rather than a temporary addition.
Planning Your Attached Outdoor Kitchen Layout
Start by identifying which exterior wall offers the best access to utilities and traffic flow. South- and west-facing walls capture afternoon sun but may require shade structures: north- and east-facing orientations stay cooler but limit natural light for evening cooking. Measure the available wall length, most functional layouts need at least 8 to 10 feet of linear counter space to accommodate a grill, prep zone, and cleanup area.
Sketch the work triangle concept used in indoor kitchens: position the grill, sink, and refrigerator within a few steps of each other to minimize wasted motion. A linear galley layout works well against a single wall, with the grill anchoring one end and the sink or beverage cooler at the other. L-shaped configurations wrap a corner, adding counter depth and creating a natural gathering spot where guests can perch on bar stools.
Account for clearance zones specified by appliance manufacturers. Built-in grills typically require 6 inches of clearance to combustible materials on each side and 24 inches above the cooking surface. If the outdoor kitchen sits under a wood-framed patio roof, verify that the roof decking or beams meet those height and material requirements, some codes mandate fiber-cement board or metal cladding above grills.
Don’t overlook door swing and foot traffic. If the back door opens directly into the cooking zone, someone entering with an armload of dishes can collide with the grill operator. Position the primary work surface at least 3 feet from the door threshold, and leave a 42-inch aisle in front of cabinetry so two people can pass comfortably.
Finally, consider sight lines. Placing the grill perpendicular to the house wall lets the cook face the yard, pool, or patio seating rather than staring at siding. This orientation also vents smoke away from open windows and keeps grease splatter off the house exterior.
Essential Features for House-Attached Outdoor Kitchens
A functional outdoor kitchen balances cooking capacity, storage, and prep space. Built-in grills remain the centerpiece, choose between natural gas and propane based on existing utility hookups. Natural gas eliminates tank swaps but requires a licensed plumber to tap the house line and run black iron pipe or approved flexible connector. Propane offers portability and higher BTU output but demands secure tank storage: many jurisdictions prohibit tanks inside enclosed cabinets without proper ventilation.
Counter space should flank both sides of the grill. Allocate at least 18 inches on the hinge side for plated food coming off the grates and 24 inches on the opposite side for raw proteins and utensils. Granite, concrete, and porcelain tile withstand heat and weather, while laminate and butcher block degrade quickly outdoors unless sheltered under a solid roof.
A sink transforms meal prep and cleanup. Even a small 15-inch bar sink with a single-handle faucet beats running indoors to rinse vegetables or wash hands. Install a P-trap that drains to the house sewer or septic system, never route gray water onto the lawn, which violates most plumbing codes. In climates with freeze-thaw cycles, add a shut-off valve inside the house and an air gap or drain-down valve outdoors to prevent burst pipes.
Refrigeration options range from compact beverage coolers to full-size outdoor-rated refrigerators. Standard indoor units rust and fail outdoors: look for stainless-steel construction with sealed backs and weather-resistant controls. Undercounter models slide into base cabinetry, while freestanding units may require a dedicated alcove with ventilation clearance.
Storage cabinets protect charcoal, pellets, grilling tools, and serving platters from rain and pests. Marine-grade polymer or stainless-steel cabinetry resists rust better than powder-coated steel, especially in coastal or humid regions. Install soft-close hinges and stainless hardware, zinc-plated screws corrode within a season. For drawer boxes, consider inspiration from outdoor cabinetry design trends that emphasize weather-sealed joinery and UV-resistant finishes.
Utilities and Infrastructure Considerations
Electrical circuits must comply with NEC requirements for outdoor installations. At minimum, install a 20-amp GFCI-protected circuit for outlets and appliances. If adding a refrigerator, microwave, or electric smoker, calculate total amperage and run dedicated circuits to avoid tripped breakers. Outdoor receptacles require weatherproof covers, spring-loaded “while-in-use” covers stay closed when plugs remain inserted. Mount outlets at least 6 inches above counter height to prevent water intrusion during rainstorms.
Gas lines demand a licensed plumber or gas fitter in most jurisdictions. Black iron pipe remains the standard for buried or concealed runs, while corrugated stainless-steel tubing (CSST) simplifies retrofits through walls and joist bays. Size the line to deliver adequate pressure at the grill, undersized pipe starves burners and prevents full heat output. Terminate with a manual shut-off valve within 3 feet of each appliance and install a drip leg to catch moisture and debris.
Water supply requires freeze-proof installation in cold climates. Run PEX tubing through exterior walls with foam insulation around the penetration, and pitch the line back toward the indoor shut-off so residual water drains when closed. Alternatively, install a frost-free sillcock that places the valve seat inside the conditioned envelope, eliminating standing water outdoors.
Drainage ties into the house sewer or septic system unless local code permits a dry well for gray water. Slope drain pipes at least ¼ inch per foot to prevent standing water, and install cleanout fittings at direction changes for future maintenance.
Material Selection for Durability and Style
Outdoor kitchens endure temperature swings, UV exposure, rain, and humidity that degrade materials tolerated indoors. Masonry bases, concrete block, brick, or poured concrete, provide the most durable foundation. Lay block on a 4-inch gravel bed topped with a poured footing below the frost line to prevent heaving. Brick veneer adds visual warmth but requires a concrete backer and weep holes to drain trapped moisture.
Stone veneer over a wood or steel frame offers a lighter alternative. Use manufactured stone for consistent thickness and simpler installation, or natural fieldstone for rustic texture. Both require a water-resistant barrier and metal lath behind the veneer to prevent rot in the framing. For inspiration on blending stone with regional styles, many projects draw from Southern outdoor living design that emphasizes natural materials and covered porches.
Stucco and fiber-cement siding match the house exterior and cost less than stone. Apply stucco over foam insulation board and galvanized lath, finishing with an acrylic topcoat that resists cracking. Fiber-cement panels install like wood siding but won’t warp, split, or invite termites. Both materials accept paint, so color changes remain simple.
Countertop materials must handle heat, stains, and freeze-thaw cycles. Granite slabs resist scratching and heat but require sealing every one to two years. Concrete counters accept integral color and custom edge profiles but crack if the base settles. Porcelain slabs in 2- or 3-centimeter thickness mimic marble or soapstone without the maintenance, and they tolerate direct heat from pans. Tile works for budget builds, use frost-proof porcelain or ceramic rated for outdoor use and seal grout lines annually to prevent water infiltration.
Roofing options depend on whether the kitchen attaches under an existing eave or requires a new structure. Extending the house roofline maintains architectural continuity: match the existing shingle type and color, and flash the joint where new sheathing meets the wall to prevent leaks. Freestanding pergolas add shade without blocking sky views but offer no rain protection. Metal roofs, standing seam or corrugated panels, shed water quickly and last decades with minimal upkeep.
Building Codes and Permits for Attached Structures
Any outdoor kitchen attached to the house counts as an addition in most jurisdictions, triggering permit requirements for electrical, plumbing, gas, and structural work. Building permits verify that footings, framing, and roofing meet wind and snow load tables in the International Residential Code (IRC). Inspectors check footing depth, rebar placement, joist sizing, and fastener schedules, skipping the permit risks fines and complicates future home sales when buyers discover unpermitted work.
Electrical permits ensure GFCI protection, proper wire gauge, and weatherproof boxes. The inspector verifies that circuits terminate at the main panel with correct breaker sizing and that outdoor receptacles sit at code-compliant heights. If adding lighting, specify wet-location fixtures rated for direct exposure to rain.
Plumbing permits cover water supply, drain lines, and gas piping. The inspector tests gas connections with a pressure gauge to detect leaks and verifies that drain slopes meet code. Some jurisdictions require a backflow preventer on outdoor faucets to protect the potable water supply from contamination.
Setback rules dictate how close structures can sit to property lines. Most residential zones require at least 5 feet from side and rear boundaries, though covered structures sometimes demand greater distances. Verify setbacks with the local zoning office before pouring concrete, a few inches can make the difference between approval and a teardown order.
Homeowners associations (HOAs) often impose design restrictions beyond municipal codes. Review covenants for rules on exterior finishes, roof materials, color palettes, and maximum structure heights. Submit plans to the architectural review committee before starting work: approval can take weeks or months, and denied applications may require redesigns.
Design Ideas to Seamlessly Connect Indoor and Outdoor Spaces
A successful attached outdoor kitchen feels like a continuation of the home’s interior rather than an afterthought. Match siding and trim to the house exterior, if the main structure features board-and-batten siding and white trim, carry those elements onto the outdoor kitchen facade. Repeating window trim profiles and corner boards unifies the elevation.
Flooring transitions matter as much as walls. Extend interior tile or hardwood onto a covered patio, then switch to stamped concrete or pavers where the roof ends and weather exposure begins. Keep the color palette consistent: if indoor floors lean gray, choose pavers in charcoal or slate tones rather than jumping to terra cotta. Large-format pavers (12×24 inches or bigger) reduce grout lines and create a cleaner look that mirrors interior tile.
Lighting layers blend function and ambiance. Install recessed canister lights in the patio roof soffit for task lighting over the grill and prep zones, spacing them 4 to 6 feet apart. Add pendant fixtures above a bar or dining counter, choosing weather-rated models with tempered glass or metal shades. Low-voltage LED strip lights under counter edges and along steps improve safety without glare. Dimmer switches let the mood shift from bright work light to soft evening glow.
Pass-through windows or bi-fold doors dissolve the boundary between indoor and outdoor kitchens. A window with a sill at counter height lets someone inside hand off plates and drinks without stepping outdoors. Bi-fold or multi-slide glass doors stack open to unify the spaces entirely, turning two rooms into one continuous zone. Insulated glass and quality weatherstripping prevent energy loss when closed.
Built-in seating anchored to the house creates a defined gathering spot. A low stacked-stone or stucco wall topped with concrete cap stones or wood benches offers durable perches that need no maintenance. Add outdoor cushions in fade-resistant fabric during use and store them indoors between seasons. For layout and material ideas that integrate landscaping with hardscaping, garden-to-kitchen design guides showcase how plantings can soften the transition from cooking zone to yard.
Color and finish continuity ties everything together. If interior cabinetry skews modern with flat-panel doors and brushed nickel hardware, choose outdoor cabinets with similar door styles and matching pulls. Paint outdoor trim the same color as indoor trim, and coordinate countertop tones so granite or concrete outdoors echoes stone or quartz inside. These small alignments signal intentional design rather than a series of disconnected projects.